Changing the blog post date, published date, created date, and updated date (both within the schema and the blog post itself) is crucial for Shopify SEO. Search engines like Google, Bing, and DuckDuckGo often favor fresh, regularly updated content. Updating these dates in your Shopify articles signals to search engines that your content is relevant and current, potentially boosting your search rankings.
From a user perspective, recent dates on blog posts imply that the information is current and reliable. This builds trust and encourages engagement with your content. However, Shopify, by default, only displays the created date, even if you regularly update your articles. This means your efforts may go unnoticed, particularly by search engines. While Shopify does include only the published date in the schema, it doesn’t display the updated date, so it’s important to go further to demonstrate your commitment to fresh content and communicate this to Google. To do this, you’ll need to make some changes to your Liquid file. This article will guide you through the process.
- Access Theme Code Editor
- Locate Main Article Liquid File
- Find Blog Date Settings
- Duplicate Date Section
- Modify Date Properties
- Update Schema Section
- Save and Validate Changes
1. Access Theme Code Editor
In your Shopify admin, go to Online Store > Themes. Find your current theme and click the Actions button (three dots). Select Edit code.
2. Locate the Main Article Liquid File
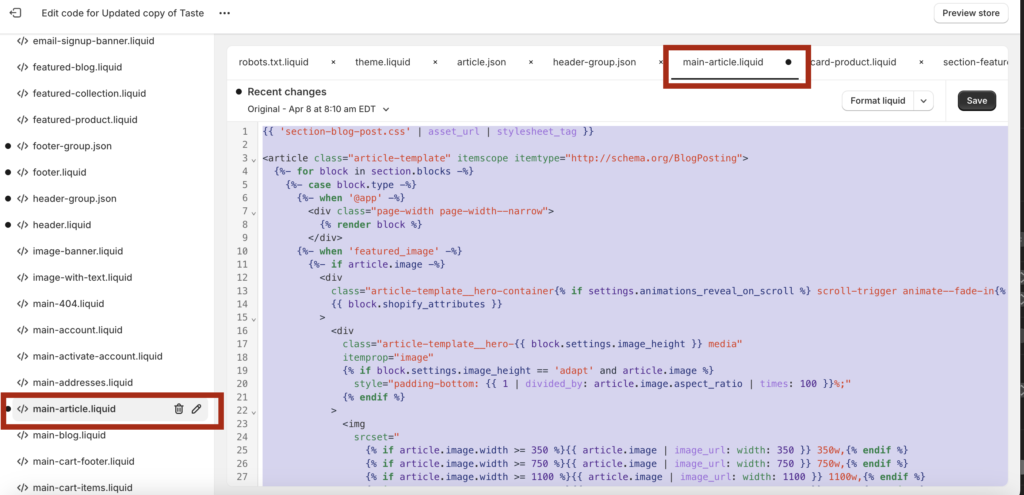
In the left sidebar, navigate to the Sections folder. Look for a file named ‘main-article.liquid ‘or similar (the exact name can vary depending on your theme).
The main-article.liquid file is the place where you can customize how individual blog posts appear on your Shopify store’s blog. For example, you can adjust the layout of the post’s elements, such as moving the author’s name above the title. You can also control the functionality of the comment section, like whether to allow anonymous comments. Finally, you can change the formatting of dates, displaying them in a “Month, Day, Year” format instead of the default.
3. Find Blog Date Settings
Within the code, search for a block that controls the display of the blog post date. This usually looks like this:
{%- if block.settings.blog_show_date -%}
  <span class="circle-divider caption-with-letter-spacing" itemprop="dateCreated pubdate datePublished">
    {{- article.published_at | time_tag: format: 'date' -}}
  </span>
{%- endif -%}
Here’s what’s happening:
{%- if block.settings.blog_show_date -%}: This is a conditional statement. It checks if the blog is configured to show the date (block.settings.blog_show_dateis a theme setting). If the setting is enabled (set totrue), the code within theifblock will be executed.<span ...>: This HTML tag creates a container element to hold the date.class="circle-divider caption-with-letter-spacing": These are CSS classes that control the appearance of the date element.itemprop="dateCreated pubdate datePublished": This is part of schema.org’s structured data vocabulary, telling search engines that this is the date the article was created, published, and modified.
{{- article.published_at | time_tag: format: 'date' -}}: This is Liquid code that does the following:article.published_at: Retrieves the original published date of the blog post.| time_tag: format: 'date': Formats the date into a human-readable format (e.g., “May 29, 2024”).{{- ... -}}: These curly braces with hyphens remove extra whitespace before and after the output.
{%- endif -%}: This marks the end of the conditional block.
By default, Shopify adds all lines under one schema line "itemprop="dateCreated pubdate datePublished". The first problem is that schema.org does not recognize the "pubdate" value, which will show up as a mistake when you check the schema with a validator. To fix this, remove "pubdate" from the code, leaving it like this:
{%- if block.settings.blog_show_date -%}
  <span class="circle-divider caption-with-letter-spacing" itemprop="datePublished">
    {{- article.published_at | time_tag: format: 'date' -}}
  </span>
{%- endif -%}
Another issue is that Shopify doesn’t provide separate lines displaying the “published” and “updated” dates, so we’ll need to create that ourselves. Once you’ve removed the unnecessary ‘pubdate’, you can duplicate the entire code block to create a second date display.
4. Duplicate Date Section
Shopify’s Liquid templating system doesn’t automatically provide a way to display the “last updated” date for blog posts. By duplicating the existing code block that shows the “published” date, we create a placeholder for where the “updated” date information will eventually go. It’s like preparing a spot in the layout for the new information.
Here’s what it looks like:
{%- if block.settings.blog_show_date -%}
<span class="circle-divider caption-with-letter-spacing" itemprop="datePublished">
{{- article.published_at | time_tag: format: 'date' -}} </span>
{%- endif -%}
You should duplicate the entire code snippet—from {%- if block.settings.blog_show_date -%} to {%- endif -%}—and paste it directly below the original code. This ensures that the conditional logic remains intact, and the duplicated code will only run if the blog is set to show the date.
5. Modify Date Properties
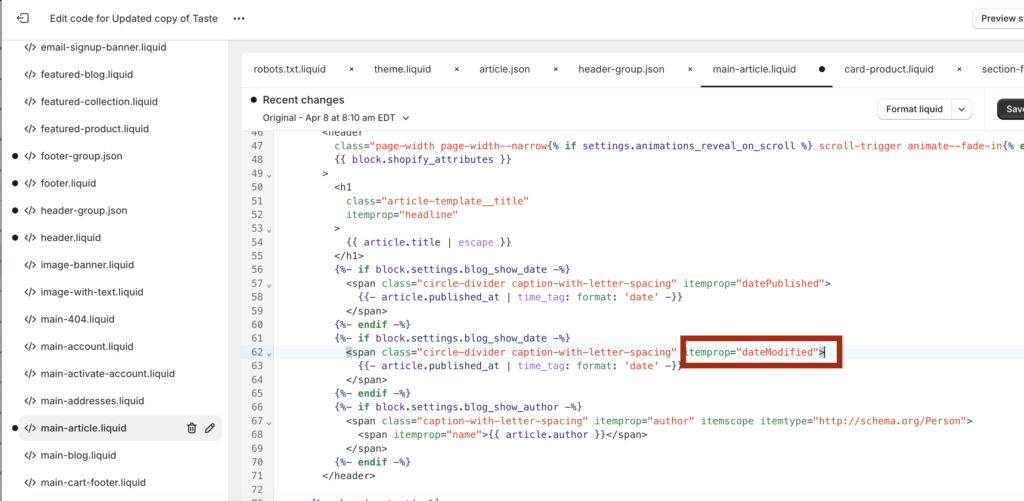
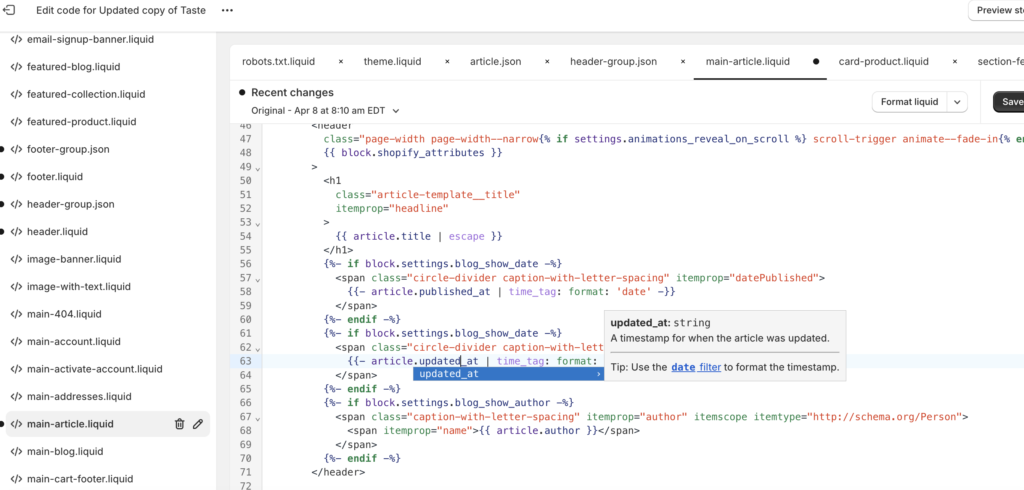
We need to make two changes to the duplicated code block. First, we’ll change the itemprop parameter from “datePublished” to “dateModified” to reflect the correct schema.org property. Second, we’ll replace article.published_at with article.updated_at in the Liquid code to display the last updated date instead of the published date.
Code Changes:
- Change
itemprop: Code snippetitemprop="datePublished" --> itemprop="dateModified" - Replace
article.published_atwitharticle.updated_at: Code snippet{{- article.published_at | time_tag: format: 'date' -}} --> {{- article.updated_at | time_tag: format: 'date' -}}
Explanation:
itemprop="dateModified": This change ensures the correct semantic meaning for search engines and other applications that use schema.org. It indicates that the following date is the date the article was last modified.article.updated_at: This Liquid code fetches the date and time when the blog post was last updated.time_tag: format: 'date': This filter formats the date into a human-readable format (e.g., “May 29, 2024”).
Here is what it looks like.
Now that we’ve created a new rule for the updated date, you must also assign a new parameter at the bottom of the same Liquid file.
6. Update Schema Section
Scroll down to the bottom of the file and look for a section with the type:
application/ld+json.
This is where your schema data is located. And is usually somewhere at the bottom of the main-article.liquid.
So scroll down until you find the part with application/ld+json.
Here’s what it looks like.
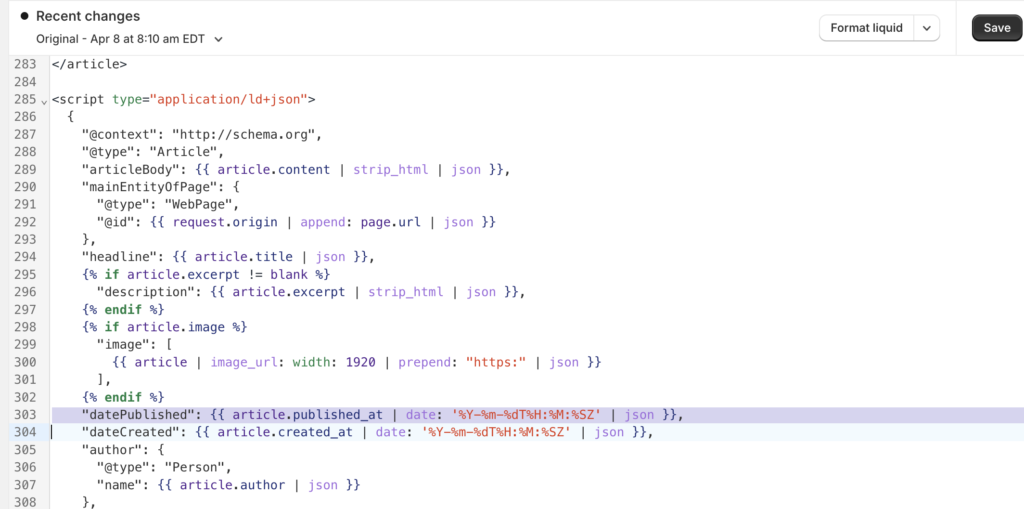
This code is part of a JSON-LD (JavaScript Object Notation for Linked Data) script block, which is a way to embed structured data into a webpage. This structured data helps search engines better understand the content of the page and display it more effectively in search results.
The specific lines you provided are defining two properties within the JSON-LD object:
"datePublished": This represents the date the article was originally published."dateCreated": This is the date the article was initially created (which might be different from the publication date).
Let’s dissect the Liquid code within these lines:
article.published_at: This accesses thepublished_atproperty of thearticleobject, which contains the date and time the article was published.| date: '%Y-%m-%dT%H:%M:%SZ': This Liquid filter formats the date into a specific format known as ISO 8601. This format is commonly used for dates in structured data:%Y: The year (four digits)%m: The month (two digits)%d: The day (two digits)T: A separator between date and time%H: The hour (24-hour clock)%M: The minute (two digits)%S: The second (two digits)Z: Indicates Zulu time (UTC)
| json: This filter ensures that the formatted date is correctly encoded as a JSON string.
Adding the “updated” Date
To include the last modified date in the JSON-LD, you would duplicate the line for "datePublished" and modify it as follows:
JSON
"dateModified": {{ article.updated_at | date: '%Y-%m-%dT%H:%M:%SZ' | json }}, Here is the breakdown of the code.
"dateModified": This property represents the date the article was last modified according to schema.org.{{ article.updated_at }} This liquid code is used to retrieve the date from the article object when the article was last updated.| date: '%Y-%m-%dT%H:%M:%SZ' | json: This filter will format the data into the ISO 8601 standard format.
Key Points
- The
updated_atproperty should be available if your Shopify theme is tracking when articles are modified. If it’s not, you might need to add logic to your theme to track and store this information. - By including the “dateModified” property, you’re providing additional context to search engines about when the content was last updated, which can be helpful for SEO.
- Remember that customizing your Shopify theme can lead to potential issues with updates, so always back up your files before making changes.
7. Save and Validate Changes
Click Save to save your changes.
Test your blog post by using a schema validator tool like the Schema.org Markup Validator or the Google Rich Results Test. This will help you ensure that your changes are implemented correctly and that the updated date is appearing properly in the schema.
Good luck!

